Day -36 Managing Persistent Volumes in Your Deployment 💥

Introduction :
Persistent Volumes (PVs) and Persistent Volume Claims (PVCs) are Kubernetes resources used to manage storage in a cluster.
They provide a way to abstract the underlying storage infrastructure and allow developers and operators to dynamically provision and manage storage for applications.
Here's an introduction to PVs and PVCs in Kubernetes:
1. Persistent Volume (PV):
Purpose: A Persistent Volume is a piece of storage in the cluster that has been provisioned by an administrator or dynamically provisioned using a StorageClass. PVs abstract the underlying storage, whether it's from a local disk, network-attached storage (NAS), or cloud provider-specific storage.
Properties: PVs have properties such as storage capacity, access modes (e.g., ReadWriteOnce, ReadOnlyMany, ReadWriteMany), and storage class.
Lifecycle: PVs have a lifecycle independent of pods and are typically created by a cluster administrator. They exist until they are manually deleted.
2. Persistent Volume Claim (PVC):
Purpose: A Persistent Volume Claim is a request for storage by a user or a pod. PVCs are used by developers to request a specific amount of storage with certain access requirements (access mode, storage class).
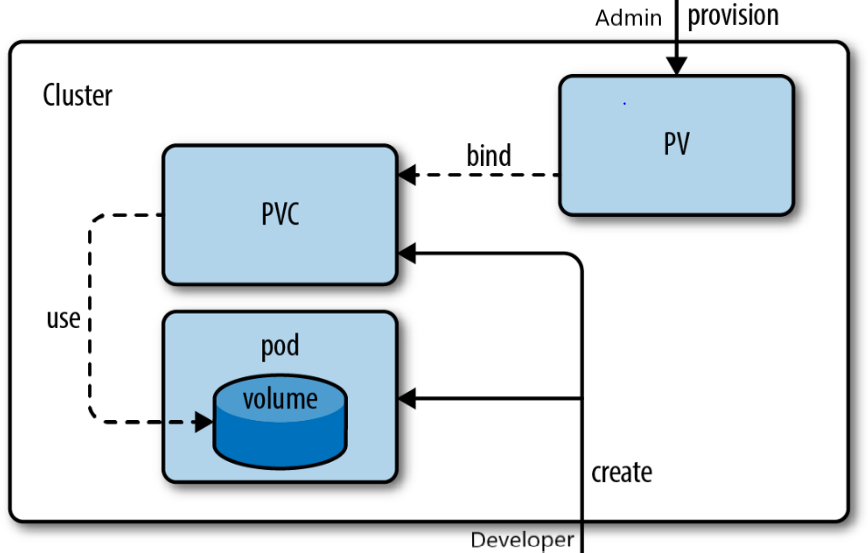
Binding: When a PVC is created, Kubernetes tries to find a suitable PV that meets the PVC's requirements. If a matching PV exists, it is bound to the PVC. If not, a new PV can be dynamically provisioned using a StorageClass.
Pod Consumption: Pods can then use the PVC as a volume by referencing it in their pod specification. When a pod is deleted, the PVC is not automatically deleted, allowing data to persist for other pods that might use the same PVC.
3. StorageClass:
Purpose: A StorageClass is a Kubernetes resource that defines storage provisioning policies and allows dynamic provisioning of PVs. It abstracts the details of storage types and backends, making it easier to manage storage across different environments.
Provisioning: When a PVC is created without specifying a PV, it can reference a StorageClass. The StorageClass determines how and where the PV is provisioned based on predefined rules and parameters.
Examples: StorageClasses can be configured to provision PVs from different storage backends like local storage, NFS, or cloud storage providers.
Here's a basic example of how PVs and PVCs work together:
Creating a StorageClass: The cluster administrator defines a StorageClass that specifies how PVs should be provisioned. For example, it might specify that PVs should be provisioned on a specific cloud provider's block storage service.
Creating a PVC: A developer creates a PVC by specifying the desired storage size and access mode and referencing the StorageClass in the PVC definition.
apiVersion: v1
kind: PersistentVolumeClaim
metadata:
  name: my-pvc
spec:
  accessModes:
    - ReadWriteOnce
  storageClassName: my-storage-class
  resources:
    requests:
      storage: 1Gi
Binding a PV: Kubernetes automatically binds the PVC to an available PV that matches the criteria defined in the PVC. If no suitable PV exists, a new one is dynamically provisioned based on the rules defined in the StorageClass.
Pods Using PVC: Developers can create pods that use the PVC as a volume by referencing it in the pod's YAML specification.
apiVersion: v1
kind: Pod
metadata:
  name: my-pod
spec:
  containers:
  - name: my-app
    image: my-app-image
    volumeMounts:
    - name: data-volume
      mountPath: /data
  volumes:
  - name: data-volume
    persistentVolumeClaim:
      claimName: my-pvc
Persistent Volumes and Persistent Volume Claims in Kubernetes provide a powerful way to manage storage resources for your applications in a scalable and abstracted manner, making it easier to handle storage provisioning, scaling, and management in a containerized environment.
Task 1:
Create a Persistent Volume using a file on your node.
Create a Persistent Volume Claim that references the Persistent Volume.
Update your deployment.yml / Pod.yml file to include the Persistent Volume Claim. After Applying pv.yml pvc.yml your deployment file looks like this
Apply the updated deployment using the command:
kubectl apply -f deployment.yml / pod.ymlVerify that the Persistent Volume has been added to your Deployment by checking the status of the Pods and Persistent Volumes in your cluster. Use this commands
kubectl getpods,kubectl get pv, kubectl get pvc.
Step 1: Create a Persistent Volume (PV) YAML file, let's call it pv.yml.

Below is the pv.yml.

Step 2: Create a Persistent Volume Claim (PVC) YAML file, let's call it pvc.yml.

Create the PVC.yml using kubectl apply -f <yaml_file>.

Step 3: Update your deployment / Pod YAML file (let's call it pod.yml) to include the Persistent Volume Claim (PVC) in the volumes and volume mounts sections of your container specification, as shown :

Now check for the pod :

Step 4: Verify that the Persistent Volume has been added to your Deployment / Pod by checking the status of the Pods and Persistent Volumes in your cluster. Use this commands kubectl get pod, kubectl get pv, kubectl get pvc.

Step 5: Now access the volume attached to the pod to verify.

I hope you find the blog post helpful! If you do, don't forget to like 👍, comment 💬, and share 📢 it with your friends and colleagues.


